
🗓 Week 10 & 13
Milling:
We used the Vpanel software to mill the PCB on the Roland SRM-20 machine. I fit the 1/64" end mill and tightened it into the milling machine, set the x,y,z axis coordinates, and imported the files in order nto the machine. We first cut the "Trace" file for the etching of the copper on the board. Then we replaced the end mill bit to 1/32" to proceed to cut the "Outline" and "Drill" files for the PCB board and holes where the ESP32 would stack onto. We had made a few mistukes

Soldering:
With help from the tutors, I found the components to solder onto the PCB which were available in the Fab Lab. Most of the pieces I needed were in the Fab Lab except for the 220 Ohm resistor, which I exchanged for one just above which was 490 Ohms. The phototransistor sensor and the LED sensor had tiny green marks on them which indicated which side should connect to ground. I referred to their specific datasheets online to see how they should be mounted onto the PCB board. The datasheet of the phototransistor was a bit confusing and I had to solder it on agin in the opposite direction after the first test. In addition to the sensor, led light, and resistors, I also soldered the female pin headers onto the PCB board so it would stack onto my ESP32.

Coding:
I used a simple Arduino code for a phototransistor (light detector) that connects to an LED, and would turn the LED on when the light is "low", and off when the light is "high". I modified the pin numbers and also added a "SerialRead" command with a delay so I can read the amount of light (numbers) the phototransistor is sensing. In order to make sure the code was working, we shined a bright light on the phototransistor and made sure the numbers in the serial port went up. It took us a couple attempts to make the code work but once we adjusted the variable and used a different USBC cable to connect the ESP32, we were able to make the connection.

Key learnings:
Datasheet for phototransistor Datasheet for LED light
Output & Input
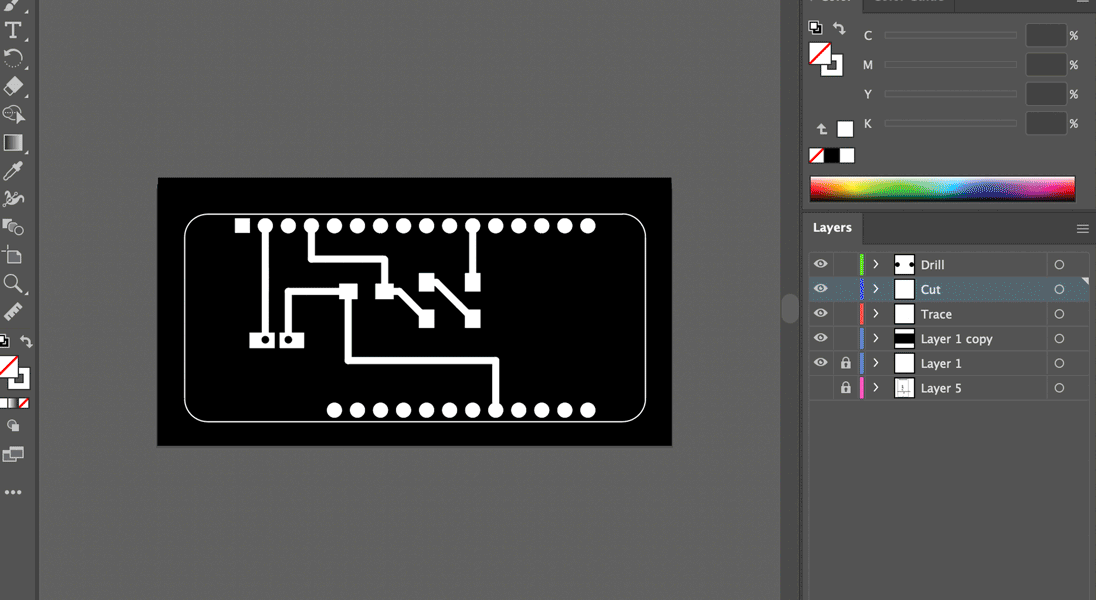
I decided to team up with Tatiana to mill and solder the board that I previously designed for Week 6 of Electronic Design. The board I designed was an attachment to the ESP32 feather, which could allow me to connect a light sensor and an LED. We began by exporting the Kicad schematic into Illustrator and separating the layers into the steps we needed to take while milling: cutting the interior design, drilling through the holes and lastly cutting the edges. Each layer was exported into a separate PNG and later imported into MODS to create the gcode file.
Milling:
We used the Vpanel software to mill the PCB on the Roland SRM-20 machine. I fit the 1/64" end mill and tightened it into the milling machine, set the x,y,z axis coordinates, and imported the files in order nto the machine. We first cut the "Trace" file for the etching of the copper on the board. Then we replaced the end mill bit to 1/32" to proceed to cut the "Outline" and "Drill" files for the PCB board and holes where the ESP32 would stack onto. We had made a few mistukes
Soldering:
With help from the tutors, I found the components to solder onto the PCB which were available in the Fab Lab. Most of the pieces I needed were in the Fab Lab except for the 220 Ohm resistor, which I exchanged for one just above which was 490 Ohms. The phototransistor sensor and the LED sensor had tiny green marks on them which indicated which side should connect to ground. I referred to their specific datasheets online to see how they should be mounted onto the PCB board. The datasheet of the phototransistor was a bit confusing and I had to solder it on agin in the opposite direction after the first test. In addition to the sensor, led light, and resistors, I also soldered the female pin headers onto the PCB board so it would stack onto my ESP32.
Coding:
I used a simple Arduino code for a phototransistor (light detector) that connects to an LED, and would turn the LED on when the light is "low", and off when the light is "high". I modified the pin numbers and also added a "SerialRead" command with a delay so I can read the amount of light (numbers) the phototransistor is sensing. In order to make sure the code was working, we shined a bright light on the phototransistor and made sure the numbers in the serial port went up. It took us a couple attempts to make the code work but once we adjusted the variable and used a different USBC cable to connect the ESP32, we were able to make the connection.
Key learnings:
- setting up the 0;0 origin: we did not realise it was set to a default of 10;10;10, which caused us to mill in the air as opposed to the PCB material.
- 100% CMYK layout. Some of the graphics were not 100% C, M, Y, and K, which made it undetectable by the software and thus did not cut those points.
- making sure to export at 1000pp quality to get full precision.
- making sure to tape the entire back of the PCB board and firmly pressed onto the milling board
Datasheet for phototransistor Datasheet for LED light