
🗓 Week 3 / 9 February 2022
Materials that could be used with laser cutter: wood, cardboard, fabrics, plastics. We looked at the anatomy of the laser cutter machine and the parts that are crucial for functioning. Design considerations: tolerance, kerf: accounting for material that is burnt, Three golden rules of laser cutter: focus the material, check power, frequency and speed, and turn on extraction.
Assignment:
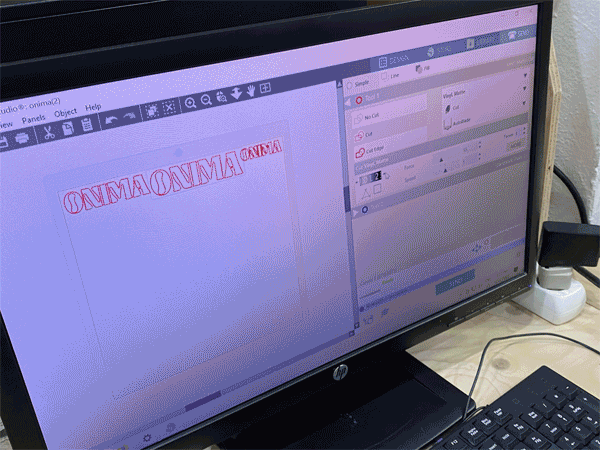
The vinyl cutter was straight forward to use. I printed 3 different sizes of a logo I had on my computer and tested the application of each on a glass surface.
Since I am completely new to working with 3D modeling softwares, I consulted a few of my classmates to decide on which software I should start with. After some thought, I decided to start with Rhino 3D and Grasshopper because it seemed most useful in the long run and compatible with various machines at Fab Lab BCN.
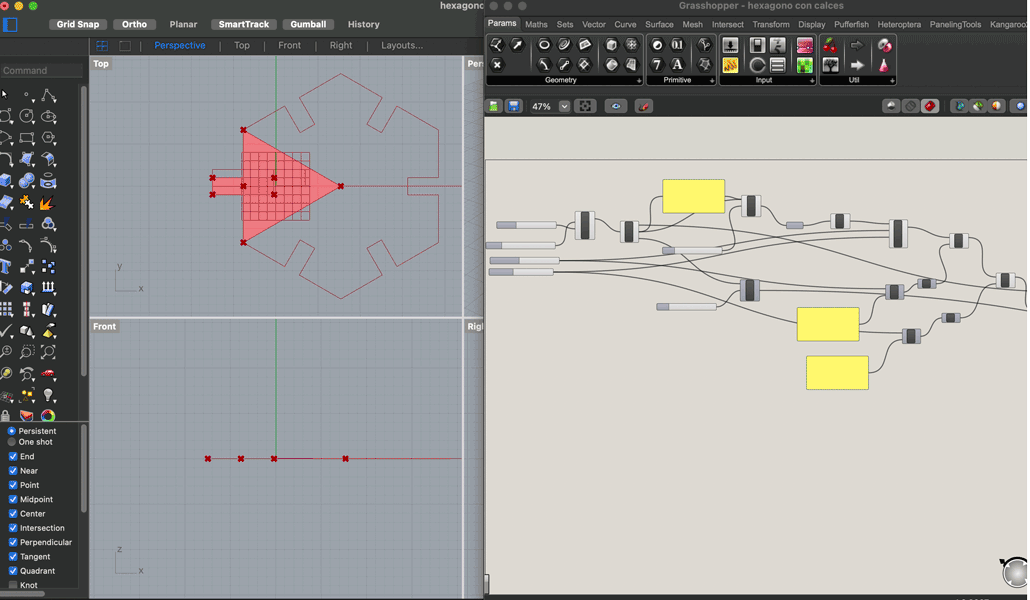
Although I wanted to make something relevant to my interests, I realized I was running behind in spending too much time conceptualizing what to make (also due to covid), and needed to just try creating and cutting something simple to understand the process first. With Joaquin's help, I started exploring Grasshopper and created a simple polygon with six sides. We used the "DeBrep" function to deconstruct the polygon into a single triangle component (three lines). Once this triangle shape was isolated, we located the midpoint of the triangle, and centered the rectangle at the midpoint. Since we had already tested the kerf of the laser cutter and doing press-fit with the MDF, I knew the sidth of the rectangle had to be 2.4mm wide for a perfect fit. Then we used the difference of the triangle and rectangle to "cut out" the shape we needed and deconstructed them further so we could array polar them 5x around to reform the six sides of the hexagon.
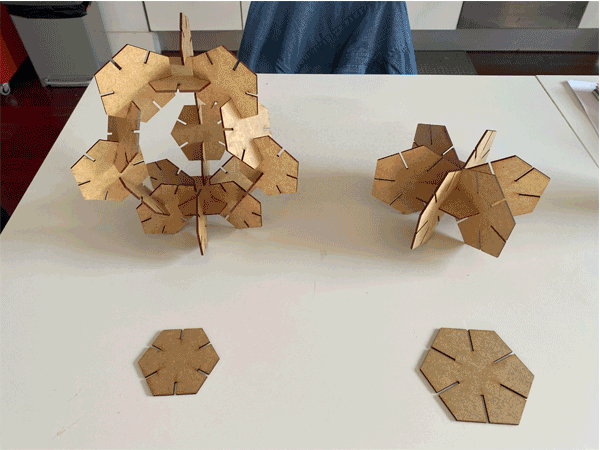
At the laser cutter, I made a test of two shapes first and tried joining them. Then I realized that the lengths of the rectangle divots were too long, as when they were fit together, the length multiplied and went over the center of the piece. I was able to modify the length in Grasshopper and made the pieces smaller to take up less space on the MDF board. I was happy with the way the pieces turned out. Although they were simple, because of their simplicity they provided many options for joining and creating different shapes.
Computer-Controlled Cutting
We learned about the history of laser cutting starting from the 1950s with the microwave application to the machines that we are using today. We reviewed the two main processes in computer aided manufacturing: additive and subtractive. Additive processes start with nothing and add material, ie. 3D machine. Subtractive processes start with the material and reduce, ie. laser cutter, vinyl, CNC.Materials that could be used with laser cutter: wood, cardboard, fabrics, plastics. We looked at the anatomy of the laser cutter machine and the parts that are crucial for functioning. Design considerations: tolerance, kerf: accounting for material that is burnt, Three golden rules of laser cutter: focus the material, check power, frequency and speed, and turn on extraction.
Assignment:
The vinyl cutter was straight forward to use. I printed 3 different sizes of a logo I had on my computer and tested the application of each on a glass surface.
Since I am completely new to working with 3D modeling softwares, I consulted a few of my classmates to decide on which software I should start with. After some thought, I decided to start with Rhino 3D and Grasshopper because it seemed most useful in the long run and compatible with various machines at Fab Lab BCN.
Although I wanted to make something relevant to my interests, I realized I was running behind in spending too much time conceptualizing what to make (also due to covid), and needed to just try creating and cutting something simple to understand the process first. With Joaquin's help, I started exploring Grasshopper and created a simple polygon with six sides. We used the "DeBrep" function to deconstruct the polygon into a single triangle component (three lines). Once this triangle shape was isolated, we located the midpoint of the triangle, and centered the rectangle at the midpoint. Since we had already tested the kerf of the laser cutter and doing press-fit with the MDF, I knew the sidth of the rectangle had to be 2.4mm wide for a perfect fit. Then we used the difference of the triangle and rectangle to "cut out" the shape we needed and deconstructed them further so we could array polar them 5x around to reform the six sides of the hexagon.
At the laser cutter, I made a test of two shapes first and tried joining them. Then I realized that the lengths of the rectangle divots were too long, as when they were fit together, the length multiplied and went over the center of the piece. I was able to modify the length in Grasshopper and made the pieces smaller to take up less space on the MDF board. I was happy with the way the pieces turned out. Although they were simple, because of their simplicity they provided many options for joining and creating different shapes.